1. Introduction
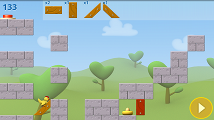
 This article will cover one of the possible workflows that you can use in order to create Android games using Blender for content creation. This article is based on the knowledge that I could gather during the development of Egg Savior. For the programming part, I will assume that you have some knowledge about game creation in Android. If this is not the case, please start by reading these great tutorials before continuing. For the graphics part, I will assume that you know how to create graphics with blender. If this is not the case, please start by reading these great tutorials, or consider hiring a blender artist.
 Blender is a powerful 3D content creation tool that has proved application in many different areas. It even includes a game engine that you can use to develop PC games. There are several 3D games made with Blender, starting by Yo Frankie, the first open game from the Blender Foundation. But the most important feature of Blender is its license: which makes it open-source, and free of charge.
So why use a 3D tool for 2D games? Because unless you are a great 2D artist, it is easier and faster to animate in 3D, and it is easier to get an acceptable overall result if you are not very good with graphics (like is my case). The obvious trick is to pre-render the 3D graphics into 2D images and use these images as assets for your game.
In the following sections I will explain how you can build your own pipeline for working with blender for 2D Android game creation. I will focus first on the artistic side (Blender) and then on the engineering side (programming).
2. The Blender side (for artists only)
 I will focus on pure 2D games. There are some 2D games that fake a 3D effect (eg isometric games) but I still have to explore them and develop a workflow for these. Creating the graphics with blender is quite straightforward, and you just have to follow a few simple rules to have a set of graphics that can be used without problems in a game engine.
First of all, you should chose a hardware target for your game. Android runs on a variety of devices with different screen sizes and resolutions. You simply can't make a 2D game that looks good and runs fast on every possible device. Narrow the hardware where you want your game to run properly and then design your graphics to fit in the chosen range of supported screen resolutions and sizes.
2.1. Modeling / Shading
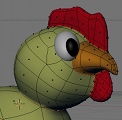 There is nothing magical here. Just ask yourself a few questions before starting:
- Which sides of the object will be seen on the screen? Maybe you don't need detail in the whole object.
- What will be the maximum size in pixels of the object? I mean, in the highest resolution device. Maybe you don't need to add feathers to your chicken because they will not be seen ;)
- Do you want to give the game a cartoon look? Take into account the cartoon edges, they also use pixels!
2.2. Rigging
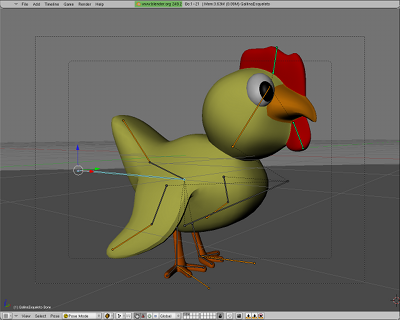
- Automate everything that you can. You will be animating lots of cycles, and the more automated is the rigging, the less effort you will need to put in animation.
- As with modeling and shading, concentrate on the level of detail. You don't want to add a muscle system that will not be seen because the character will be 64 pixels tall...
2.3. Animation
 Up to this point, I was just writing about several optimizations that you can do to work less. Now we will get into something more important, because the choices that you make in this point, are related to the choices that have to be made in the programming.
If your character is going to move across the screen because of the animation (eg walking), you have a very important decision to make, how to animate this cycle. Two options (I will use the walking example):
- Move the character across the scene while it walks. You get the highest quality of animation, because you can even change the speed of movement from step to step. The problem is that this involves a bit more complex programming.
- Walk in place, as if done in a conveyor belt. It is very easy to program, but it involves strong restrictions on the animation, that have to move the character at a constant speed.

2.4. Render
The first thing to consider in the render phase is how to configure the camera for the render of each asset. I will share my own point of view, although yours may differ (feel free to comment):- Background. I suggest using a perspective camera unless the background have to be aligned with the foreground. This will add depth to the game levels.
- Foreground objects. I am calling foreground objects to those that doesn't move, but the character can interact with them (eg platforms). I suggest using an orthogonal camera, to help them integrate well with the character. If you want to compose the foreground by tiling small objects, the orthogonal camera is the only option.
- Characters. Characters will be animated, and the last frame of the animation must match the first frame to be able to cycle it. Unless you use the "walk in place" solution, the last frame will not match the first frame if you use a perspective projection. Anyway, if the character is rendered with perspective, when it moves across the screen the eye will notice that this perspective is not changing, thus making it less believeable.

The second thing to consider is the AA filter that you must use. It depends on the target hardware, and specifically on the screen resolutions. If your graphics are going to be small because you target handhelds, you have to use a crisp filter even if it generates a bit of aliasing. You can try mitch or even catrom. If you target big screen devices with little dpi (like some tablets), then you might consider less crisp filters because the aliasing artifacts can be very noticeable. In that case, avoid catrom, try mitch or even gaussian.
The third thing to consider is the output format. I suggest using PNG in RGBA mode for the foreground and characters, as it is a quite programmer-friendly format.

3. The engineering side (for programmers only)
I have experience with the Canvas object, and will center this part in this way of working with 2D graphics. You can also program 2D graphics with OpenGL ES, and some games do it this way because you can gain some performance, but not every device supports it correctly (eg my Samsung Galaxy Spica).Rendering foreground objects on the screen is quite straightforward. You can just use the canvas methods for this:
Bitmap loadedAssetBitmap = BitmapFactory.decodeResource(...);
Rect targetArea = new Rect(left, top, right, bottom);
[...]
canvas.drawBitmap(loadedAssetBitmap, null, targetArea, null);
The difficulty comes with animated objects, like characters. There are two decisions to make:
- How to encode the animation?
- Each frame on a separate image. Easy to program, but bad for performance, as you have to decode lots of images at startup and cycle between them may also hurt the cache.
- Every frame on a single image (like a texture atlas) as suggested by Stephen Flockton. Harder to program, but better performance. Also, this option is more OpenGL-friendly, just in the case that you want to switch at some point in the future. This was the option implemented in Egg Savior, with good results. Here you have an example of the walk cycle:

- How to handle movement? This is a decision that you have to make both for programming and animation, as I wrote before. The two options, as seen from the animation:
- Walk in place, as if done in a conveyor belt. If the animation was done this way, you just compose every frame that Blender outputs in the single image and compute how many pixels should the character advance on each frame. This way, each time that you advance one animation frame, the character moves X pixels on screen.
- Move the character across the scene while it walks. If the animation was done this way, you end up with a series of frames like these three samples:As you can see, the character advances through the image. And if you play the whole animation, you will see how the character advances through the floor without foot slip. You can make a simple python script that extracts the bounding box of the character and encodes just this piece on the single image, and at the same time, encodes the offset that each new frame applies to the character with respect to the previous one. When programming this thing, you just move the character with the offset associated with each frame. This allows different offset on each frame, and gives more freedom to the animation stage.
public class SpriteFrameInfo
{
    public SpriteFrameInfo(Point pivot, Point posDelta)
    {
        _pivot = pivot;
        _posDelta = posDelta;
    }

    Point _pivot;
    Point _posDelta;
}
- posDelta is the offset that this frame must apply to the character to move it to the right position.
- pivot is the position inside the frame that can be considered as the "character position" to have it standing on the floor. This is usefull in a platform game like Egg Savior, but not as much in other 2D games.
public void updateFrameRectangle()Where:
{
int row = ((int)_curFrame) / _columns;
int col = ((int)_curFrame) % _columns;
int x = _spriteWidth * col;
int y = _spriteHeight * row;
_srcRectangle.left = x;
_srcRectangle.top = y;
_srcRectangle.right = x + _spriteWidth;
_srcRectangle.bottom = y + _spriteHeight;
}
- _curFrame is the current frame
- _columns is the number of columns of the single image that holds every frame
- _spriteWidth is the width of each frame in the sprite
- _spriteHeight is the height of each frame in the sprite
public boolean updateFrame(long deltaTimeMS)Where:
{
boolean toReturn = false;
_curFrameTime+=deltaTimeMS;
_positionDelta.set(0, 0);
while (_curFrameTime > _mspf)
{
if (_looping == true || _curFrame < _nFrames - 1)
{
_curFrame = (_curFrame + 1) % _nFrames;
_curFrameInfo = _frameInfoList.get(_curFrame);
_curFrameTime -= _mspf;
updateFrameRectangle();
Point p = _curFrameInfo.getPosDelta();
_positionDelta.x += p.x;
_positionDelta.y += p.y;
toReturn = true;
}
else
{
return toReturn;
}
}
return toReturn;
}
- _curFrameTime is the game time relative to the current frame, in miliseconds. Each time that the animation advances, it restarts counting. You need this because the animation framerate may be less than the device framerate.
- _positionDelta is offset that have to be applied to the character in this frame
- _mspf is the number of miliseconds per frame. It is obviously derived from the FPS.
- _curFrameInfo is the current instance of SpriteFrameInfo
Finally, the code that renders the sprite is almost obvious:
public void draw(Canvas canvas, int x, int y)
{
    Point pivot = _curFrameInfo.pivot;
    _tgtRectangle.left = x - pivot.x;
    _tgtRectangle.top = y - pivot.y;
    _tgtRectangle.right = _tgtRectangle.left + _spriteWidth;
    _tgtRectangle.bottom = _tgtRectangle.top + _spriteHeight;
    canvas.drawBitmap(_sheet, _srcRectangle, _tgtRectangle, null);
}
I hope that this article helps you to start developing your own 2D games. And if you are an experienced developer, feel free to share your knowledge and propose other alternatives to these ideas.
The android image of this post is a modification based on work created and shared by Google and used according to terms described in the Creative Commons 3.0 Attribution License.
This post is shared according to terms described in the Creative Commons 3.0 Attribution Share Alike License
No comments:
Post a Comment